So let me be the first to say that although I normally hate mixing front end with back end systems, especially opinionated MVCs like angular. Its really not as bad once you get used to it. But its not simple or easy most of the time, mainly because you need to understand the backend and front end systems like the back of your hand to fully appreciate how they work together. And I am no expert in rails or angular, but like many developers, my job expects me to get my shit together and make it work.
Our first problem was that we could not use Devise, because we are sharing across domains, and we cant use CORS because some of our users still use vista. So we are instead sharing tokens and data using JSONP, and encrypting and decrypting with a custom build. Not really perfect, and I would have loved to use CORS instead, but sometimes you need to get creative.
So I am starting this tutorial assuming you already have a rails/angular app created and integrated. If not i would suggest this tutorial to start you off. And I am also assuming you need to build your own auth that does not use devise. So first some stuff you will need to use and might want to read up on in case you have not yet. First thing, services, they are great, and if your new to angular you might not have used them yet, especially if your project is still young and mostly in controllers. Two, localstorage, this will keep our important variables saved even after page refreshes. Which by the way services will also help prevent as you will see soon.
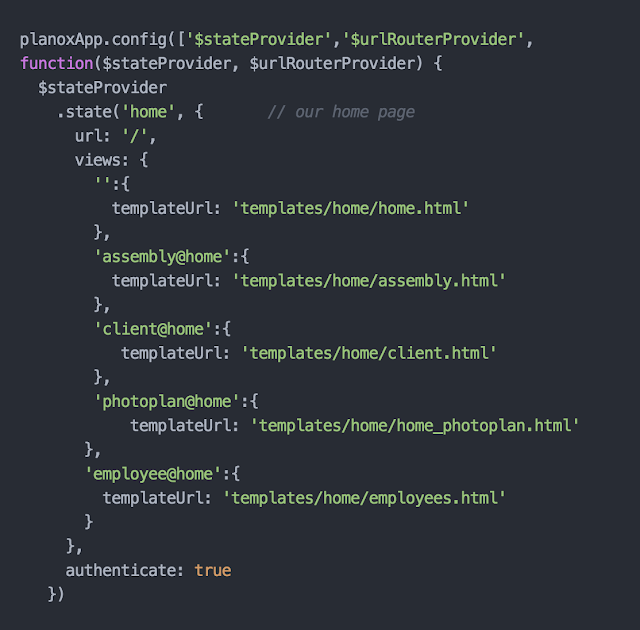
So well start with the routes first, I am assuming you are using ui-router, and if not, I would HIGHLY suggest you try it out. Its much better at routing then the standby angular comes with, at least for large projects, and especially projects living inside backend systems.
While your angular routes should be way more robust.
As im sure you can guess you'll need to add authenticate to your routes, put true if you want them lock them up from non-logged in users, and false otherwise. Also just in case you dont know this yet, please keep in mind that the home route is the route that will feed in from your application.html.erb file.
As you can see i have a few more routes, including login and all have authenticate on them. Make sure you add the otherwise to the bottom of your routes, and set it to your login page(if thats what you desire).
So your service will look something like this, you at least probably need a few of these, but you can omit filter. And inside your service we will have three functions, log in, log out, and isAuthenticated. We will call these functions in the app.run and in our controller. Well start with isAuthenticated.
So this is pretty damn simple, we saved a boolean value in a local storage variable called AuthAccept, and when we call that variable we are looking to see if its still true or false. So now we can go check out our log in function which has all the magic.
Okay so when we call this in our controller we are going to pass it two variables, the email and password. As you can see we send these values in a JSONP object that returns a failure or success message. If it fails we pop up error messages, and if they are a real user we save a few things to local storage. Now if your using CORS you will do this with a post request, and will have way less code, and all the power to you. But if your unlucky and have to use JSONP your code will look closer to this. Once you confirm that the user is a real one, then you need to set AuthAccept = true, and put it in local storage, this saves that our user is logged in. And you can set the state.go to home, or wherever you want your users to be directed.
So now we can look at our controller, its pretty simple, just calling the functions in AuthService from a click event. But what you might take not of, is if you need your local storage variables in the scope you will need to set them equal to a scope variable, as im doing here. I use this to hide my footer and nav bar among other things.
And thats basically the gist of this tutorial, if anyone has questions or concerns feel free to comment.


No comments:
Post a Comment